Saturday, October 20, 2007

Superfast Model Driven Development with EMF (III)

Load and Save

In the previous postings (part I and part II) I've created an EMF model to hold the definition of an adventure game. I've used the EMF-generated editors to create an adventure and wrote a little bit of code to run the game.

In this posting I'm going to look at how we can use the EMF built-in serialization as a very easy way to load and save the game state. At the end I will also show how to run the program from the command line outside of Eclipse.

To implement Load and Save, I'm adding two new actions to every location in the game (a player can load and save in every game location): SaveAction and LoadAction.

The SaveAction creates a new SaveGame instance and stores the current location and the current inventory in it.

Looking at the model again, you can see that the SaveGame contains an Inventory object but only has a relation to the Location. This has an impact wrt to the content of the file that we're saving to. The contained items are actually inlined in the file where the referenced items are stored as hrefs.

A sample adventure.save file would look like this. The format of this XML file is called XMI, but as you can see, it reads as very typical XML. You can see that the inventory is actually contained in the file but the location is pointed to. When we save the file, it is in the same Resource Set as the My.adventure resource, so that's how they know about each other. The href URL also explains why we need an ID attribute. It is used in there. The ID attribute value cannot have a space in it so that's why it's generally handy to use a separate attribute for it.
<adv:savegame version="2.0" xmi="http://www.omg.org/XMI" adv="http://adventure">
  <inventory>
    <items name="Spade" id="spade"/ >
  </inventory>
  <location
    href="file:/C:/EMF_Adventure/bin/My.adventure#desert"/>
</adv:savegame>


The adventure.save file is created using the following code:
SaveGame sg =
  AdventureFactory.eINSTANCE.createSaveGame();
sg.setLocation(Status.location);
sg.setInventory(Status.inventory);


String fileName = System.getProperty("java.io.tmpdir") +
  "adventure.save";
Resource resource = Status.resourceSet.createResource(
  URI.createFileURI(fileName));
resource.getContents().add(sg);
try {
  resource.save(Collections.emptyMap());
  System.out.println("Game saved to " + fileName);
  return true;
} catch (IOException e) {
  e.printStackTrace();
} finally {
  Status.resourceSet.getResources().remove(resource);
}
  1. First we create and fill the SaveGame object.
  2. Then we add a new Resource, stored in a file called adventure.save in the temp dir, to the ResourceSet used by the game.
  3. Add the SaveGame object to the new Resource.
  4. call resource.save()
  5. Finally remove the new resource from the game's ResourceSet again as we don't want it to change after this.
And we're done.

Loading data from an XMI file is very similar. The LoadAction does the following:
String fileName = System.getProperty("java.io.tmpdir") +
  "adventure.save";
Resource resource = Status.resourceSet.getResource(
  URI.createFileURI(fileName), true);
try {
  SaveGame sg = (SaveGame) EcoreUtil.getObjectByType(
  resource.getContents(),
  AdventurePackage.eINSTANCE.getSaveGame());
  if (sg != null) {
    Status.location = sg.getLocation();
    Status.inventory = sg.getInventory();
 

    System.out.println("Game loaded from " + fileName);
    return true;
  }
} finally {
  Status.resourceSet.getResources().remove(resource);
}
  1. Create and add a resource that points to the adventure.save file. In this case we use ResourceSet.getResource() instead of ResourceSet.createResource().
  2. Then we look up all of the contents of the file and find the SaveGame object in it. Since the adventure.save file really should only contain a single SaveGame object, resource.getContents().iterator().next() would also do the job.
  3. Once we have our SaveGame object, simply change the current location of the game to be the one loaded and change the inventory to be the one from the savegame.
  4. Finally, remove the adventure.save resource from the resourcset and were done.
Well, not quite, there is actually a little problem with the above code in that we should actually revisit all the locations of the adventure game and reset the items that belong there, taking into account the items that we've just loaded, but I'll leave that for another day :)

Oh, and I'm adding the following 2 lines to Status.initializeActions() so that my load and save actions are available from every location in the game:
actions.add(new SaveAction());
actions.add(new LoadAction());

Running the program from the command line

We're not writing an Eclipse application here, we're only using Eclipse and EMF as a tool to build our app. So we just want to run everything from the commandline. To do this, add to the following jars to your CLASSPATH or copy them into your project. For EMF that comes with Eclipse 3.3.1 the needed libraries are the following, but the actual number could be slightly different if you are using a different version of Eclipse (see the EMF FAQ for more info):
  • org.eclipse.emf.common_2.3.0.v200709252135.jar
  • org.eclipse.emf.ecore_2.3.1.v200709252135.jar
  • org.eclipse.emf.ecore.change_2.3.0.v200709252135.jar
  • org.eclipse.emf.ecore.xmi_2.3.1.v200709252135.jar
Now I can run my adventure game from the command line with:

set CLASSPATH=.;
  org.eclipse.emf.common_2.3.0.v200709252135.jar;
  org.eclipse.emf.ecore_2.3.1.v200709252135.jar;
  org.eclipse.emf.ecore.change_2.3.0.v200709252135.jar;
  org.eclipse.emf.ecore.xmi_2.3.1.v200709252135.jar
java game.Main

Welcome to Adventure Island. This is the start of the adventure game. You are at the house of a Viking.
Hints: (q)uit, (i)nventory, (w)est, (e)ast, save, load, you see a Spade
Please enter command:

All the code above is available in the Subversions repository at http://coderthoughts.googlecode.com/svn/trunk/emf_adventure for more info on how to check it out look here. Want all the projects including the generated code, get it here: http://coderthoughts.googlecode.com/svn/trunk/emf_adventure_full

Superfast Model Driven Development with EMF (II)

Creating the actual adventure game
In the previous posting I used EMF to create a model and the generated editor to create a file (My.adventure) containing the definition of my text adventure game. In this posting I'm going to create the actual game.

Copy and paste the My.adventure file created in the previous posting into the src directory of the EMF_Adventure project. Also create a game package where we'll do our development. One of the reasons to do the actual development in a different place or different package than the code generated by EMF is that this way, if you make a change to your EMF code you can simply delete all the generated code and regenerate it, without having to watch out for your own files. So the EMF-generated code is in the adventure package and our code is in the game package.

The little text adventure that we'll be writing allows you to move from one location to another. It allows you to pick up items you may find or perform actions in order to find hidden items. Certain items can only be obtained once you have other items first. For example, in the sample adventure game definition (which is based on a game I wrote with my kids, get it here) you need a spade in order to dig up the treasure.

To give you an idea, here's the output from a sample running of it:
Welcome to Adventure Island. This is the start of the adventure game. You are at the house of a Viking.
Hints: (q)uit, (i)nventory, (w)est, (e)ast, save, load, you see a Spade

Please enter command:

> pick up spade
You pick up Spade...

Viking's house.
Hints: (q)uit, (i)nventory, (w)est, (e)ast, save, load
Please enter command:

> w
You're going west

You are at the Viking's boat. Will you help the Viking with his fishing?
Hints: (q)uit, (i)nventory, (e)ast, save, load
Please enter command:

etc...

I know, it's text only, which is slightly boring, but the point of this posting is about EMF. We've added images to the locations and that's actually quite easy to do, but I'll leave it up to yourselves.

The first class we'll make is the Main class which kicks off the game and holds the game loop:
package game;
 

import java.io.BufferedReader;
import java.io.InputStreamReader;
 

public class Main {
  public static void main(String[] args) throws Exception {
    Status.intializeGame();
 

    for (;;) {
      Status.describeLocation();
      String command = new BufferedReader(
        new InputStreamReader(System.in)).readLine();
      Status.executeCommand(command);
    }
  }
}

The Status class holds the game state and controls the state transitions. The first thing it does it read the EMF model instance we've created that defines the game:
public class Status {
  static Adventure adventure;
  static Location location;
  static Inventory inventory =
    AdventureFactory.eINSTANCE.createInventory();
 

  static Map<Location, List<Action>> actionMap =
    new HashMap<Location, List<Action>>();
  static ResourceSet resourceSet = new ResourceSetImpl();
 

  public static void intializeGame() throws IOException {
    resourceSet.getResourceFactoryRegistry().
      getExtensionToFactoryMap().
      put(Resource.Factory.Registry.DEFAULT_EXTENSION,
      new XMIResourceFactoryImpl());
    resourceSet.getPackageRegistry().
      put(AdventurePackage.eNS_URI,
      AdventurePackage.eINSTANCE);
 

    URI gameDefURI = URI.createURI(Status.class.
      getResource("/My.adventure").toString());
    Resource resource = resourceSet.getResource(
      gameDefURI, true);
    adventure = (Adventure) EcoreUtil.getObjectByType(
      resource.getContents(),
      AdventurePackage.eINSTANCE.getAdventure());
    location = adventure.getStartLocation();
    initializeActions();
  }


In EMF objects are persisted in a resource, which could take many forms. I am using the XMIResource which basically is an XML file in the XMI format. Not all the objects in an EMF model have to be in the same file, objects could be spread over multiple files. To associate these files with each other EMF puts them in a ResourceSet.

The first two lines of initializeGame() set up the ResourceSet to use XMI resources and also informs the EMF package registry about our Adventure model.
Another thing you might notice in the class is the creation of the inventory object. Instead of going inventory = new InventoryImpl() (which would actually work) EMF prefers you to use the Factory pattern. So we create our inventory object by calling createInventory() on the factory instead.
Next, I'm loading the game definition from the My.adventure file. EMF wants to have a URI to the resource (rather than a simple file path).
After this I use the EcoreUtil.getObjectByType() to find my single Adventure object in the Resource that has loaded the file. There are other ways to get to the objects in a resource, the simplest way is just calling resource.getContents() which returns a list of the objects in the resource. The AdventurePackage.eINSTANCE.getAdventure() returns an EClass object that represents the Adventure EMF entity. EMF has its own metamodel which is richer than the Java reflection metamodel. It basically allows you to find out all the things that you have specified in your model, over and above what can be reflected in the Java signatures. But in a way AdventurePackage.eINSTANCE.getAdventure() in EMF-speak is similar to what would be Adventure.class in Java-speak.

We now finally have our adventure object and life becomes much easier. At this point can pretty much use the EMF model instance by utilizing Pojo bean-conventions. So we set our initial location to be the location that was marked as the start location in our Adventure definition file.
Last but not least we'll initialize the actionMap.

The actionMap is a map from a location to a list of Actions that are available on that location. These actions can be added statically (e.g. the 'quit' action is available everywhere) or dynamically, such as actions that relate to routes you can take from a particular place or actions associated with items. All actions in the game implement the game.Action interface:
public interface Action {
  /** A hint to the user how to execute this action, or
  * null if there is no direct hint.
  * @return A hint such as "(q)uit" or "You see a Spade"
  */
  String hint();
 

  /** Called on the action to see does it want to execute
  * the command. The command is passed in as an array of
  * strings. If the action does not want to execute the
  * command it can just return false.
  * @param commands The commands in an Array e.g.
  * ["pick", "up", "spade"]
  * @return true if the action was performed,
  * false otherwise.
  */
  boolean execute(String[] commands);
 

  /** The minimum number of words needed for this action
  * to qualify. So if your action is triggered by "pick
  * up spade" it would return 3. The action will not be
  * visited if the number of commands is less.
  * @return The minimum number for words required to
  * visit this action
  */
  int minLength();
 

  /** Whether or not to remove the action after
  * performing it. An item action would typically be
  * removed after you've picked it up (you can't pick
  * it up twice) but other actions normally remain.
  * @return Whether or not to remove the action after
  * successful execution.
  */
  boolean removeAfter();
}


Status.initializeActions() initializes the map of all the locations in the game with the actions that are available there.

Status.describeLocation() simply prints out the description of the current location and also prints out the hints for all the commands available here. Status.executeCommand() parses the string typed in by the user and then visits the actions registered with the current location to see whether any one action wants to execute the command. See here for the rest of the Status class, apart from the initializeGame() it's fairly simple Java. There are also a number of actions provided, such as InventoryAction, ItemAction, QuitAction and RouteAction which all take care of their particular things.

Finally, because we're using the XMI functionality to load the model, we need to make sure to specify this dependency in the bundle that holds our code. EMF generates code as OSGi bundles/eclipse plugins which use the META-INF/MANIFEST.MF file to describe their dependencies, for those who want to run this as a simple Java app we'll see later in this posting how to get these jar files on the classpath. For now just open the MANIFEST.MF file and in the Dependencies tab add 'org.eclipse.emf.ecore.xmi' to the required plugins.

Now we can actually run our game. To do this open the Main class, right-click in the editor and select 'Run As -> Java Application'. The game will start:

Welcome to Adventure Island. This is the start of the adventure game. You are at the house of a Viking.
Hints: (q)uit, (i)nventory, (w)est, (e)ast, you see a Spade
Please enter command:

All the code above is available in the Subversions repository at http://coderthoughts.googlecode.com/svn/trunk/emf_adventure for more info on how to check it out look here. Want all the projects including the generated code, get it here: http://coderthoughts.googlecode.com/svn/trunk/emf_adventure_full

In the next posting I'll use EMF to provide savegame/loadgame functionality and run the game as a plain Java App that uses EMF outside of Eclipse.

Thursday, October 18, 2007

Superfast Model Driven Development with EMF (I)

Or: write a text adventure game in no time

One of the technologies that I use quite a lot is EMF. It has helped me increase my development speed enormously, and I use it pretty much every time I need a little data model.

What is lesser known is that you don't actually need to be writing Eclipse plugins to take advantage of EMF. You can use EMF in any old Java program. Another thing Eclipse gives you is tooling around EMF and tooling for your own model, which makes it super handy.

So with the Eclipse tooling you get a nice UML editor on your EMF class model. Eclipse generates all the EMF runtime code for you, and it also generates a model instance editor, so basically you get a data entry tool for your model as well, which can be quite useful.
In addition to the modeling stuff, the EMF runtime also gives you a loading and saving of your model (to an XML file format called XMI). All of this stuff is available for free as open source.

So I've used it to write a little text adventure game framework (add your own graphics later ;) You can define the actual text adventure in the EMF model. EMF is also used to provide the load and save game functionality.

So I started off with Eclipse 3.3.1 with EMF and GMF installed (see here how that's done). We need GMF to do the graphical UML editing. I've posted a little how-to on this, in case you need help.

In this posting I'm creating the model and will generate a data entry editor for my model. The next posting will focus on the actual game and how you run it as a simple Java app.

1. Create the model
Create a project called EMF_Adventure.model and add an Ecore Model file to it (in Eclipse go to File | New | Ecore Model) and call it Adventure.ecore.

Then right-click on the Adventure.ecore file in the tree, and select 'Initialize ecore_diagram diagram file' from the popup menu. Double-click the Adventure.ecore_diagram that has just been generated and you're in the UML editor (click on the image for a clearer picture):

So now we actually create our model. My little model for the adventure game looks like this:

My model contains the definition of the structure of an Adventure.
  • The Adventure entity contains a number of Locations (containment is visualized using the diamond UML notation). One of these locations is to be the start location of the game.
  • Locations in turn have routes to other locations, they also possibly contain items. Every location has a name and a description and an ID.
  • A Route object describes how to get from one location to another.
  • Items are things you can find on a location. Certain items are visible, you just see them and can pick them up. Other items are a hidden, for instance, if you want to find the treasure you will need to dig, otherwise you don't see it. In this case there might be a precondition on another item that you need to have in your inventory to perform this action. In order to dig you may need a spade.
Besides the adventure definition, the model also contains a representation of the Inventory which contains all the items you have picked up during the game. EMF is quite nice in that it make sure the model is consistent. This means that contained objects can only have one container. So by adding an Item to your Inventory EMF will automatically remove it from the Location.

Finally the definition contains an entity used for saving and loading games. The SaveGame entity has a reference to the location where you saved the game and also holds the inventory that you had when you saved.

Another way to look at the same model is by opening the Adventure.ecore file, which gives you a tree-type view on the model.

You can either edit the model using the diagram editor or using the ecore editor. They generally keep each other in sync.

Find the Adventure.ecore file that I created here.

2. Generate a data entry tool for your model
The first thing you will need to do in order to use your EMF model is to generate code from it.

To generate your code you need to create a .genmodel file. Do this by going File -> New -> Other and then select 'Eclipse Modeling Framework | EMF Model'.

Just call it Adventure.genmodel, select 'Ecore model' as the Model Importer on the next page and then pick your Adventure.ecore file from your workspace. Then finish the wizard.

The Adventure.genmodel file contains a whole lot of settings that influence how the EMF code generation is done. I normally change at least one setting. By default EMF generates code in the project that holds the .genmodel file. I always prefer to have the generated code in another project, so I typically change the following property:
Model Directory: change from /EMF_Adventure.model/src to /EMF_Adventure/src
Then right-click on the top-level Adventure node in the Aventure.genmodel file and select 'Generate All':

The model generation gives us a couple of options:
  • Generate Model Code - this is the code that we will be using at runtime. Its an implementation of the model that we defined.
  • Generate Editor Code - this generates an Eclipse editor to fill your model with data. It can be really handy to populate your model. The Edit Code that is also generated is used internally by the editor.
  • Generate Test Code - this will create a plugin that contains test templates and some sample code that utilizes your model.
After running the generation you will get 4 new projects in your workspace that all compile without errors:

In this screenshot (again click on it for a high-res version) you can see some of the generated code. Currently open is the Item class which contains getters and setters for all the properties we defined in the model. Both interface and implementation are generated for the model, our implementation is generated in the adventure.impl package.

Now we can run it to create our adventure content! Just right-click any of the newly generated projects and select 'Run As -> Eclipse Application'.
This starts up a separate Eclipse Runtime that contains your newly generated editor. Create a new project in it and add a new adventure model file by going 'File -> New -> Example EMF Creation Wizards -> Adventure Model':

Call it My.adventure and select 'Adventure' as the Model Object in the last wizard page.

Once you have your file, you can double-click it and voilĂ  there is your editor where you can define your adventure. It will allow you to create all your locations, items and routes. It also has a properties view where various properties are edited. And this all without writing a single line of code!

The actual file edited is an XML file. I created one based on a little adventure I made with my kids a little while ago, you can find it here.

In the next post, we'll create the adventure runtime.

How to get the EMF UML editor bits into Eclipse

This is not really a blog entry per se, its more a little how-to on getting your tools set up for the next blog entry.

All of the tools required here are open source.

Well, first you have to get Eclipse: I've downloaded the 'classic' distribution of Eclipse 3.3.1 from www.eclipse.org.

Then use the Eclipse update mechanism to get the EMF bits.

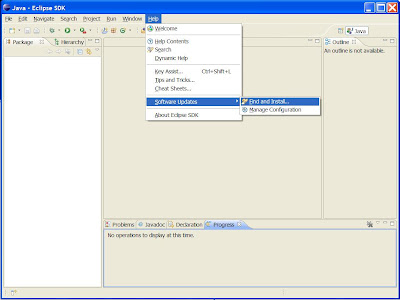
Start Eclipse and select the menu 'Help -> Software Updates -> Find and Install' (click on the image for a better picture)


Select 'Search for new features to install', then select the 'Europa Discovery Site':


In the following wizard page (called 'Search Results') select 'Graphical Modeling Framework' in the 'Models and Model Development' section. Then hit the 'Select Required' button.


I'm selecting GMF because that thechnology provides the UML-style class diagram editor for EMF. Since GMF depends on EMF, you will get all the needed EMF bits too by hitting the 'Select Required' button.

Hit next 'Next' a couple of times and then hit Finish.

Eclipse will now download and install EMF.

Thursday, October 4, 2007

First posting

Le Code pour le Code - or: Just for the fun of it :)