Thursday, July 12, 2012

Controlling OSGi Services in Cloud Ecosystems

In my previous post I looked at the basics of setting up an OSGi Cloud Ecosystem. With that as a basis I'm going to look at an issue that was brought up during the second OSGi Cloud Workshop, held this year at EclipseCon in Washington, where this list of ideas was produced. One of topics on this list is about new ways in which services can fail in a cloud scenario. For example, a service invocation might fail because the service consumer's credit card has expired. Or the number of invocations allocated to a certain client has been used up, etc.

In this post I'll be looking at how to address this in the OSGi Cloud Ecosystem architecture that I've been writing about.

First lets look at the scenario where a cloud service grants a maximum number of invocations to a certain consumer.

An invocation policy for a remote OSGi service


From the consumer side, I'm simply invoking my remote demo TestService as usual:
  TestService ts = ... from the Service Registry ...
  String result = ts.doit();

On the Service Provider side we need to add additional control. As this control (normally) only applies to remote consumers from another framework in the cloud I've extended the OSGi Remote Services implementation to provide extra control points. I did this on a branch of the Apache CXF-DOSGi project, which is the Remote Services implementation I'm using. I came up with the idea of a RemoteServiceFactory. Conceptually a bit similar to a normal OSGi ServiceFactory. Where the normal OSGi ServiceFactory can provide a new service instance for each client bundle, a RemoteServiceFactory can provide a new service (and exert other control) for each remote client. I'm currently distinguishing each client by IP address, not completely sure whether this covers all the cases, maybe some sort of a security context would also make sense in here.
My initial version of the RemoteServiceFactory interface looks like this:
  public interface RemoteServiceFactory {
    public Object getService(String clientIP, ServiceReference reference);
    public void ungetService(String clientIP, ServiceReference reference, Object service);
  }

Now we can put the additional controls in place. I can limit service invocations to 3 per IP address:
public class TestServiceRSF implements RemoteServiceFactory, ... {
  ConcurrentMap<String, AtomicInteger> invocationCountnew ConcurrentHashMap<>();

  @Override
  public Object getService(String clientIP, ServiceReference reference) {
    AtomicInteger count = getCount(clientIP);
    int amount = count.incrementAndGet();
    if (amount > 3)
      throw new InvocationsExhaustedException("Maximum invocations reached for: " + clientIP);

    return 
new TestServiceImpl(); // or reuse an existing one
  }
 

  private AtomicInteger getCount(String ipAddr) {
    AtomicInteger newCnt = new AtomicInteger();
    AtomicInteger oldCnt = invocationCount.putIfAbsent(ipAddr, newCnt);
    return oldCnt == null ? newCnt : oldCnt;
  }

A RemoteServiceFactory allows me to add other policies as well, for example it can prevent concurrent invocations from a single consumer, see here for an example, select provided functionality based on the client or even charge the customer per invocation.

To register the RemoteServiceFactory in the system I'm currently adding it as a service registration property:
public class Activator implements BundleActivator {
  // ...
  public void start(BundleContext context) throws Exception {
    TestService ts = new TestServiceImpl();
    Dictionary<String, Object> tsProps = new Hashtable<>();
    tsProps.put("service.exported.interfaces", "*");
    tsProps.put("service.exported.configs", "org.coderthoughts.configtype.cloud");
    RemoteServiceFactory tsControl = new TestServiceRSF(context);
    tsProps.put("org.coderthoughts.remote.service.factory", tsControl);
    tsReg = context.registerService(TestService.class.getName(), ts, tsProps);
   ...

More control to the client

Being able to control the service as described above is nice, but seeing an exception in the client when trying to invoke the service isn't great. It would be good if the client could prevent such a situation by asking the framework whether a service it's hosting will accept invocations. For this I added service variables to the OSGiFramework interface. You can ask frameworks in the ecosystem for metadata regarding the services it provides:
  public interface OSGiFramework {
    String getServiceVariable(long serviceID, String name);
  }

I implemented this idea using the OSGi Monitor Admin service (chapter 119 of the Compendium Specification)

Service Variables are accessed via OSGi Monitor Admin

From my client servlet I'm checking the service status before calling the service:
  fw.getServiceVariable(serviceID, OSGiFramework.SV_STATUS);
(note given a service reference, you can find out whether it's remote by checking for the service.imported property, you can find the hosting framework instance by matching their endpoint.framework.uuid properties and you can get the service ID of the service in that framework by looking up the endpoint.service.id of the remote service - see here for an example).
So I can ask the OSGiFramework whether I can invoke the service, it can respond with various return codes, as a starting point for possible return values, I took the following list, largely inspired by the HTTP response codes:
  SERVICE_STATUS_OK // HTTP 200
  SERVICE_STATUS_UNAUTHORIZED // HTTP 401
  SERVICE_STATUS_PAYMENT_NEEDED // HTTP 402
  SERVICE_STATUS_FORBIDDEN // HTTP 403
  SERVICE_STATUS_NOT_FOUND // HTTP 404
  SERVICE_STATUS_QUOTA_EXCEEDED // HTTP 413
  SERVICE_STATUS_SERVER_ERROR // HTTP 500
  SERVICE_STATUS_TEMPORARY_UNAVAILABLE // HTTP 503

It might also be worth adding some response codes around saying that things are still ok, but not for long, I was thinking of these responses:
  SERVICE_STATUS_OK_QUOTA_ALMOST_EXCEEDED
  SERVICE_STATUS_OK_PAYMENT_INFO_NEEDED_SOON
These need more thought but I think they can provide an interesting mechanism in preventing outages.

Under the hood I'm using the OSGi Monitor Admin Specification. I took an implementation from KnowHowLab (thanks guys!). It gives a nice Whiteboard pattern-based approach to providing metadata via a Monitorable service. As the RemoteServiceFactory is the place where I'm implementing the policies for my TestService, it provides me a natural place to publish the metadata too.

When the client calls OSGiFramework.getServiceVariable(id, SV_STATUS) the OSGiFramework service implementation in turn finds the matching Monitorable, which provides the status information. The Monitorable for my TestService is implemented by its RemoteServiceFactory:
public class TestServiceRSF implements ..., Monitorable {
  ConcurrentMap<String, AtomicInteger> invocationCount = new ConcurrentHashMap<>(); 

  // ...

  @Override
  public StatusVariable getStatusVariable(String var) throws IllegalArgumentException {
    String ip = getIPAddress(var);
    AtomicInteger count = invocationCount.get(ip);

    String status;
    if (count == null) {
      status = OSGiFramework.SERVICE_STATUS_NOT_FOUND;
    } else {
      if (count.get() < 3)
        status = OSGiFramework.SERVICE_STATUS_OK;
      else
        status = OSGiFramework.SERVICE_STATUS_QUOTA_EXCEEDED;
    }
    return new StatusVariable(var, StatusVariable.CM_SI, status);
  }

  private String getIPAddress(String var) {
    // The client IP is the suffix of the variable name
    if (!var.startsWith(OSGiFramework.SERVICE_STATUS_PREFIX))
      throw new IllegalArgumentException("Not a valid status variable: " + var);


    String ip = var.substring(OSGiFramework.SERVICE_STATUS_PREFIX.length());
    return ip;
  }

Using MonitorAdmin thought the OSGi ServiceRegistry gives me a nice, loosely coupled mechanism to provide remote service metadata. It fits nicely with the RemoteServiceFactory approach but can also be implemented otherwise.

When I use my web servlet again I can see it all in action. It invokes the test service 5 times:


In the Web UI you can see the 2 OSGi Frameworks in this cloud ecosystem. The local one (that also hosts the Web UI) and another one in a different cloud VM.
The Servlet hosting the webpage invokes the TestService 5 times. In this case there is only a remote instance available. After 3 invocations it reports that the invocation quota have been used up.

The Web UI servlet also invokes another remote service (the LongRunningService) twice concurrently. You can see the policy that prevents concurrent invocation in action where only one invocation succeds (it waits for a while then returns 42) and the other reports an error and does not invoke the actual service.

The demo simply displays the service status and the return value from the remote service, but given this information I can do some interesting things.
  • I can make the OSGi service consumer aware and avoid services that are not OK to invoke. Standard OSGi service mechanics allow me to switch to another service without much ado. 
  • I can go even further and add a mechanism in the OSGi framework that automatically hides services if they are not OK to invoke. I wrote a blog post a while ago on how that can be done: Altering OSGi Service Lookups with Service Registry Hooks - the standard OSGi Service Registry Hooks allow you to do things like this.

Do it yourself!

I have updated osgi-cloud-infra (and its source) with the changes to the OSGiFramework service. The bundles in this project are also updated to contain the Monitor Admin service implementation and the changes to CXF-DOSGi that I made on my branch to support the RemoteServiceFactory.

Additionally I updated the demo bundles in osgi-cloud-disco-demo to implement the RemoteServiceFactory, add Service Variables and update the webui as above.

There are no changes to the discovery server component.

Instructions to run it all are identical to what was described in the previous blog post - just follow the steps from 'try it out' in that post and you'll see it in action.
Note that it's possible that this code will be updated in the future. I've tagged this version as 0.2 in git.

Thursday, June 28, 2012

Cloud ecosystems with OSGi

One of the areas where I think that the dynamic services architecture of OSGi can really shine is in the context of cloud. And what I have in mind here is a cloud ecosystem comprised of multiple nodes in a cloud, or possibly across clouds, where each node in this ecosystem potentially has a different role from the other. In such a system the various nodes need to be able to work together to perform some function, and hooking the pieces together is really where the fun starts because how do you know from inside one cloud vm where the other ones are? Various people are working on solutions for this which range from elastic IP addresses to plugging in variables when launching a VM and various other ones. While I agree that these solutions provide value I think that they should not necessarily bleed into the space of the developer or even the deployer. The deployer should simply be able to select a cloud, create a few instances and associate them together. At that point they should nicely work together. 


This is where OSGi Services come in. OSGi Services implement a Java interface (we might see OSGi services in other languages too in the not too distant future) and are registered in the OSGi Service Registry. Consumers of these services are not tied to the provider as they select the service on its interface or other properties. The provider could be any other bundle in the OSGi Framework, or when using OSGi Remote Services they could be in a different framework. The OSGi Remote Services specs also describe a mechanism for discovery which makes it possible to find remote OSGi services using the standard OSGi Service Registry mechanisms (or component frameworks such as Blueprint, DS, etc).


So I started prototyping such a cloud ecosystem using Red Hat's OpenShift cloud combined with OSGi Remote Services. However you'll see that my bundles are pure OSGi bundles that don't depend on any type of cloud - they simply use the OSGi Service Registry as normal...


In the diagram each OSGi Framework is potentially running in its own Cloud VM, although multiple frameworks could also share VMs (this would be a deployment choice and doesn't affect the architecture).

Before diving into the details, my setup allows me to:
  • register OSGi Services to be shared with other OSGi frameworks within the ecosystem.
  • see what other frameworks are running in this ecosystem. This would be useful information for a provisioning agent.
What's so special about this? Isn't this just OSGi Remote Services? Yes, I'm using those, but the interesting bit is the discovery component which binds the cloud ecosystem together. The user of the Remote Services doesn't need to know where they physically are. Similarly, the provider of the remoted service doesn't need to know how its distributed.

As with any of my blog articles, I'm sharing the details of all this below, so do try this at home :) Most of the work here relates to setting up the infrastructure. Hopefully we can see cloud vendors provide something like this in the not too distant future which would give you a nice and clean deployment infrastructure for creating dynamic OSGi-based cloud ecosystems (i.e. an OSGi PAAS).

The view from inside an OSGi bundle

Very simple. The provider of a service marks it as shared for use in the cloud ecosystem by adding 2 extra service registration properties. I'm using the standard OSGi Remote Service property service.exported.interfaces for this, however with a special config type: org.coderthoughts.configtype.cloud. This config type is picked up by the infrastructure to mean that it needs to be shared in the current cloud ecosystem.

I wrote a set of demo bundles to show the OSGi cloud ecosystem in action. One of the demo bundles registers a TestService, using the standard BundleContext API and adds these properties:

public class Activator implements BundleActivator {
  public void start(BundleContext context) throws Exception {
    TestService dr = new TestServiceImpl();
    Dictionary props = new Hashtable();
    props.put("service.exported.interfaces", "*");
    props.put("service.exported.configs",
              "org.coderthoughts.configtype.cloud");
    context.registerService(TestService.class.getName(), dr, props);
  }
  ....
}
You can see the full provider class here: Activator.java

Consuming the service is completely non-intrusive. My demo also contains a Servlet that provides a simple Web UI to test the service and makes invocations on it. It doesn't need to specify anything special to use an OSGi service that might be in another framework instance. It uses a standard OSGi ServiceTracker to look up the TestService:

ServiceTracker testServiceTracker = new ServiceTracker(context, TestService.class.getName(), null) {
  public Object addingService(ServiceReference reference) {
    testServicesRefs.add(reference);
    return super.addingService(reference);
  }

  public void removedService(ServiceReference reference, 
                             Object service) {
    testServicesRefs.remove(reference);
    super.removedService(reference, service);
  }
};
testServiceTracker.open();
For the whole thing, see here: MyServlet.java

I used plain OSGi Service APIs here, but you can also use Blueprint, DS or whatever OSGi Component technology to work with the services...

The main point is that we are doing purely Service Oriented Programming. As long as the services are available somewhere in the ecosystem their consumers will find them. If a cloud VM dies or another is added, the dynamic capabilities of OSGi Services will rebind the consumers to the changed service locations. The code that deals with the services doesn't deal with the physical cloud topology at all.


Try it out!

As always on this blog I'm providing detailed steps to try this out yourself. Note that I'm using Red Hat's OpenShift which gives you 3 cloud instances for development purposes for free. The rest is all opensource software so you can get going straight away.

Also note that you can set this up using other clouds too, or even across different clouds, the OSGi bundles aren't affected by this at all. So if you prefer another cloud the only thing you need to do there is setup the Discovery system for that cloud; the same OSGi bundles will work.

Cloud instances

For this example I'm using 3 cloud VMs to create my ecosystem. All of which are based on the OpenShift 'DIY' cartridge as I explained in my previous posting. They have the following names:
  • discoserver - provides the Discovery functionality
  • osgi1 and osgi2 - two logically identical OSGi frameworks

Discovery

The Discovery functionality is based on Apache ZooKeeper and actually runs in its own cloud vm. Everything you need is available from the github project osgi-cloud-discovery.

Here's how I get it into my cloud image (same as described in my previous post):
$ git clone ssh://blahblahblah@discoserver-coderthoughts.rhcloud.com/~/git/discoserver.git/ (this is the URL given to you when you created the OpenShift vm)
$ cd discoserver
$ git fetch https://github.com/bosschaert/osgi-cloud-discovery.git
$ git merge -Xtheirs FETCH_HEAD 

then launch the VM:
$ git push
... after a while you'll see:
Starting zookeeper ... STARTED
Done - I've got my discovery system started in the cloud.

I didn't replicate discovery (for fault tolerance) here for simplicity, that can be added later.


The OSGi Frameworks

For the OSGi Frameworks I'm starting off with 2 identical frameworks which contain the baseline infrastructure. I put this infrastructure in the osgi-cloud-infra github project. To get this into your VM clone as provided by the OpenShift 'DIY' cartridge do similar to the above:
$ git clone ssh://blahblahblah@osgi1-coderthoughts.rhcloud.com/~/git/osgi1.git/
$ cd osgi1
$ git fetch https://github.com/bosschaert/osgi-cloud-infra.git
$ git merge -Xtheirs FETCH_HEAD 

At this point it gets a little tricky as I'm setting up an SSH tunnel to the discovery instance to make this vm part of the discovery domain. To do this, I create an SSH key which I'm adding to my OpenShift account, then each instance that's part of my ecosystem uses that key to set up the SSH tunnel.

Create the key and upload it to OpenShift:
$ cd disco-tunnel
$ ssh-keygen -t rsa -f disco_id_rsa
$ rhc sshkey add -i disco -k disco_id_rsa.pub 

Create a script that sets up the tunnel. For this we also need to know the SSH URL of the discovery VM. This is the blahblahblah@discoserver-coderthoughts.rhcloud.com identifier (or whatever OpenShift provided to you). In the disco-tunnel directory is a template for this script, copy it and add the identifier to the DISCOVERY_VM variable in the script:
cp create-tunnel-template.sh create-tunnel.sh
$ vi create-tunnel.sh
... set the DISCOVERY_VM variable ...

finally add the new files in here to git:
$ git add create-tunnel.sh disco_id_rsa*

For any further OSGi framework instances, you can simply copy the files added to git here (create-tunnel.sh and disco_id_rsa*) and add to the git repo. 

As you can see, this bit is quite OpenShift specific. It's a once-off thing that needs setting up and it's not really ideal, I hope that cloud vendors will make something like this easier in the future :)


Add Demo bundles

At this point I have my cloud instances set up as far as the infrastructure goes. However, they don't do much yet given that I don't have any application bundles. I want to deploy my TestService as described above and I'm also going to deploy the little Servlet-based Web UI that invokes it so that we can see it happening. The demo bundles are hosted in a source project: osgi-cloud-disco-demo.

To deploy, clone and build the demo bundles:
$ git clone git://github.com/bosschaert/osgi-cloud-disco-demo.git
$ cd osgi-cloud-disco-demo
$ mvn install

Next thing we need to do is deploy the bundles. For now I'm using static deployment but I'm planning to expand to dynamic deployment in the future.

I'm deploying the Servlet-based Web UI bundle first. The osgi-cloud-demo-disco source tree contains a script that can do the copying and updates the configuration to deploy the bundles in the framework:
$ ./copy-to-webui-framework.sh ~/clones/osgi1

In the osgi1 clone I can now see that the bundles have been added and the configuration to deploy them updated:
$ git status
#    modified:   osgi/equinox/config/config.ini
# Untracked files:
#    osgi/equinox/bundles/cloud-disco-demo-api-1.0.0-SNAPSHOT.jar
#    osgi/equinox/bundles/cloud-disco-demo-web-ui-1.0.0-SNAPSHOT.jar
Add them all to git and commit and push the git repo:
$ git add osgi/equinox
$ git commit -m "An OSGi Framework Image"
$ git push

The cloud VM is started as part of the 'git push'.

Let's try the demo web ui, go to the /webui context of the domain that OpenShift provided to you and it will display the OSGi Frameworks known to the system and all the TestService instances:
There is 1 framework known (the one running the webui) and no TestService instances. So far so good.

Next we'll make the TestService available in another Cloud vm.
Create another cloud VM (e.g. osgi2) identical to osgi1, but without the demo bundles.

Then deploy the demo service provider bundles:
$ ./copy-to-provider-framework.sh ~/clones/osgi2

In the osgi2 clone I can now see that the bundles have been added and the configuration to deploy them updated:
$ git status
# On branch master
#    modified:   osgi/equinox/config/config.ini
#
# Untracked files:
#    osgi/equinox/bundles/cloud-disco-demo-api-1.0.0-SNAPSHOT.jar
#    osgi/equinox/bundles/cloud-disco-demo-provider-1.0.0-SNAPSHOT.jar

Add them all to git and commit and push the git repo:
$ git add osgi/equinox 
$ git commit -m "An OSGi Framework Image"
$ git push

Give the system a minute or so, then refresh the web UI:

You can now see that there are 2 OSGi frameworks available in the ecosystem. The web UI (running in osgi1) invokes the test service (running in osgi2) which, as a return value, reports its UUID to show that its running in the other instance.

Programming model

The nice thing here is that I stayed within the OSGi programming model. My bundles simply use an OSGi ServiceTracker to look up the framework instances (which are represented as services) and the TestService. I don't have any configuration code to wire up the remote services. This all goes through the OSGi Remote Services-based discovery mechanism.
Also, the TestService is invoked as a normal OSGi Service. The only 'special' thing I did here was to mark the TestService as exported in the cloud with some service properties.

Conclusion

This is just a start... I think it opens up some very interesting possibilities and I intend to write more posts in the near future about dynamic provisioning in this context, service monitoring and other cloud topics. The example I've been running here is on my employer's (Red Hat) OpenShift cloud - but it can work on any cloud or even across clouds and the bundles providing the functionality generally don't need to know at all what cloud they're in...

Some additional notes

Cloud instances typically have a limited set of ports they can open to the outside world. In the case of OpenShift you currently get only one: port 8080 which is mapped to external port 80. If you're running multiple applications in a single cloud VM this can sometimes be a problem as they each may want to have their own port. OSGi actually helps here too. It provides the OSGi HTTP Service where bundles can register any number of resources, servlets etc on different contexts of the same port. So in my example I'm running my Servlet on /webui but I'm also using Apache CXF-DOSGi as the Remote Services implementation which exposes the OSGi Services on the same port but different contexts. As many web-related technologies in OSGi are built on the HTTP Service they can all happily coexist on a single port.

Friday, May 18, 2012

OSGi on OpenShift (Free, OpenSource Cloud)

While JBoss OSGi support for OpenShift is being looked at, I had a go at getting Apache Felix to work on OpenShift. And I have to say, the results were good :)

OpenShift is Red Hat's cloud. You can create and use cloud instances for free, for development purposes - a free cloud playground!! 
OpenShift comes with a number of cartridges, including a somewhat reduced version of JBoss AS7 (no OSGi), Node.js and Jenkins. However OpenShift also has a DIY application type. With this you can deploy whatever you like :) So, I took the Felix OSGi framework and deployed that in OpenShift using the DIY type!

Here's what I did.
1. Get a free OpenShift account by signing up at http://openshift.redhat.com
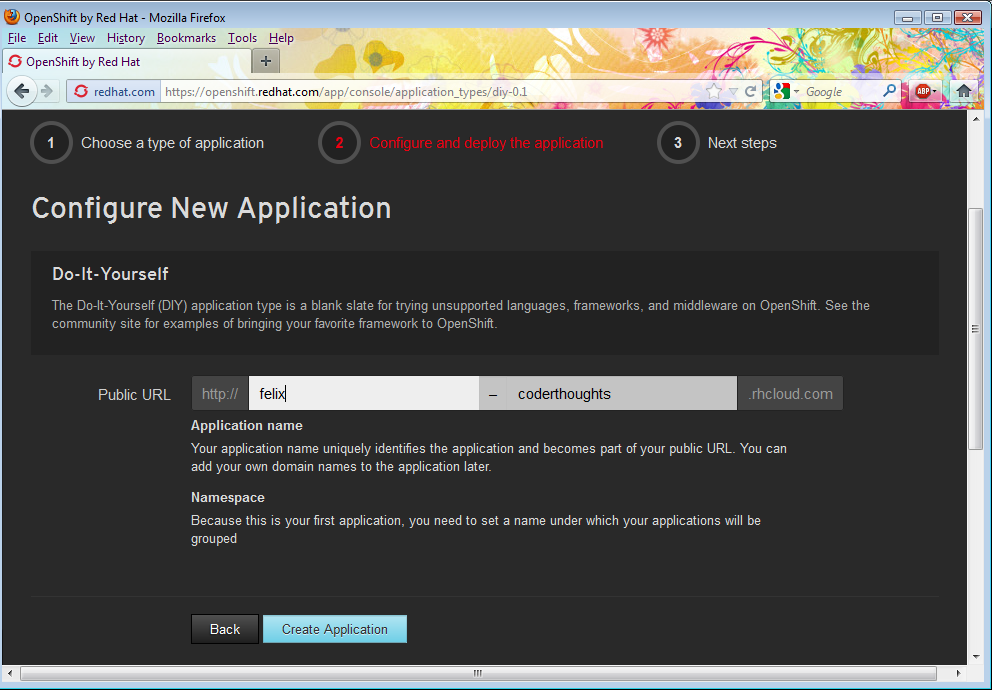
2. Once you have your account you can create an application:
Select the Do-It-Yourself application type.

3. Create a URL for the application:
I went for http://felix-coderthoughts.rhcloud.com.
When you click create, the an empty holder application is created for you. We can fill the application in using git.

4. Now you can clone the application using git, OpenShift will tell you the URL to use, mine looks like this:
$ git clone ssh://blahblahblah@felix-coderthoughts.rhcloud.com/~/git/felix.git
Oh, yes, it only works once you have an SSH key added to your account. You can do that in the 'My Account' section of the web console, or from the command line, see here for more info.

5. At this point you can start putting your cloud content into git. Initially your clone contains a README, some mostly empty directories and some openshift hooks:
$ ls -a
.git        README        misc
.openshift  diy

So what next?
I started by adding a modified Apache Felix installation to a directory called osgi/felix-framework-4.0.2. I took Felix 4.0.2 and instead of the gogo terminal-based console bundles I used the Web Console with Config Admin and Pax-Web.

Next we need to modify the OpenShift action hooks to start the OSGi Framework. This is what my .openshift/action_hooks/start script does:
cd $OPENSHIFT_GEAR_DIR/repo/osgi/felix-framework-4.0.2
export felixcmd="java -Dorg.ops4j.pax.web.listening.addresses=$OPENSHIFT_INTERNAL_IP -jar bin/felix.jar"
nohup $felixcmd &
First the current directory is changed to where Felix is stored, and then Felix is launched with as extra option for Pax Web, the IP address that OpenShift wants us to use. The port number is configured as 8080, as required by OpenShift, this is specified in the Felix configuration file.

That's pretty much it - I also created a fairly blunt stop script that kills all the Java processed. I guess that could be refined ;)

Ok, so let's try it out.
As a convenience I added this setup as a github project called felix-openshift, you can get it into your freshly cloned OpenShift repo with:
$ git fetch git://github.com/bosschaert/felix-openshift.git
From git://github.com/bosschaert/felix-openshift
 * branch            HEAD       -> FETCH_HEAD
Then merge the content in with:
$ git merge -Xtheirs FETCH_HEAD
Note that -Xtheirs automatically takes the start and stop scripts from the fetched project and overwrites the local ones. If your git client doesn't support this option you'll probably have to merge these scripts by hand...

To see it all in action, run:

$ git push
Counting objects: 32, done.
Delta compression using up to 8 threads.
Compressing objects: 100% (21/21), done.
Writing objects: 100% (27/27), 3.49 MiB | 86 KiB/s, done.
Total 27 (delta 2), reused 10 (delta 1)
remote: Starting application...
remote: Done
... you will see more logging messages, and then ...
remote: 2012-05-17 16:19:11.133:INFO:oejs.AbstractConnector:Started NIOSocketConnectorWrapper@127.2.146.129:8080 STARTING
remote: 2012-05-17 16:19:11.561:INFO:oejsh.ContextHandler:started HttpServiceContext{httpContext=org.apache.felix.webconsole.internal.servlet.OsgiManagerHttpContext@174d93a}
Aha - the webconsole has started!

I can now launch it at http://felix-coderthoughts.rhcloud.com/system/console/bundles (or whatever your OpenShift URL is). Default Felix Web Console credentials are admin/admin:
From here on I can use the Felix Web Console to deploy more bundles, control the framework and so on.

After pushing the git repo, you can also control the cloud instance from the commandline with rhc:
$ rhc app start -a felix -l user@domain.org
and
$ rhc app stop -a felix -l user@domain.org

There you go, OSGi running in the cloud. And you can develop and play with this stuff without the need to give anyone your credit card details :)

Wednesday, February 29, 2012

Running the Penrose (or OpenJDK 8) tests

As a follow-up on my previous post, Building project Penrose (or OpenJDK 8), I wanted to run the unit tests. And, as with many other things in OpenJDK, it's different from what I was used to. While other projects typically use JUnit for unit testing, OpenJDK uses a tool called jtreg, which you'll have to install manually before you can run any tests.

Once you have jtreg installed you need to tell the build where it is (the directory specified contains linux/bin/jtreg) and add it to your path - note that the JT_HOME variable is used by the OpenJDK build:
export JT_HOME=/home/david/apps/jtreg
export PATH=$JT_HOME/linux/bin:$PATH

Now you can run the whole test suite (in your clone of http://hg.openjdk.java.net/penrose/jigsaw or whatever your clone of OpenJDK 8 is):
$ make test

The above takes a very long time (edit: in fact it doesn't properly finish at all for me, it just hangs after a number of hours).

If you're developing it's better to run a portion of the tests, for instance a single test directory:
.../jdk/test$ jtreg -testjdk:/home/david/hg/pj_230212/build/linux-i586/jdk-module-image org/openjdk/jigsaw/cli
Test results: passed: 10
Report written to /home/david/hg/pj_230212/jdk/test/JTreport/html/report.html
Results written to /home/david/hg/pj_230212/jdk/test/JTwork

or a single test class:
.../jdk/test$ jtreg -testjdk:/home/david/hg/pj_230212/build/linux-i586/jdk-module-image org/openjdk/jigsaw/cli/ModuleFileTest.java
Test results: passed: 1
Report written to /home/david/hg/pj_230212/jdk/test/JTreport/html/report.html
Results written to /home/david/hg/pj_230212/jdk/test/JTwork

Note that in the above command lines it's important to pass in the full absolute path of the JDK you're running with as some of the tests rely on that to launch certain executables (like javac).

Friday, February 24, 2012

Building project Penrose (or OpenJDK 8)

As OpenJDK Project Penrose was approved last week, I started looking at getting set up to actually be able to contribute to OpenJDK and Penrose.
As I had never built OpenJDK before I started looking for the build page. While OpenJDK build page says that there is no OpenJDK 8 build readme yet, the link behind the 'coming soon' text actually contains some useful information but it relates to old versions of Linux and I want to get this working on Fedora 16 :)

Currently the Penrose codebase is still the same as the Jigsaw code base, so the steps below also apply to building Jigsaw, and they also work for plain OpenJDK 8.
At some point there will be changes in the Penrose codebase, but I don't expect that they will change the build process much, if at all.

While Julien Ponge nicely describes how to get this working on Ubuntu, the steps are a bit different on Fedora 16, so I'm documenting here how to get started from a fresh new Fedora 16 machine.

Get a few dependencies first:
# set up gcc and the static version of libstdc++
sudo yum install gcc gcc-c++ libstdc++-static

# install build deps on alsa, freetype and cups
sudo yum install alsa-lib-devel freetype-devel cups-devel

# install some X11 headers
sudo yum libXt-devel libXext-devel libXrender-devel libXtst-devel

# get mercurial
sudo yum install mercurial

# install Java 7 and ant
sudo yum install java-1.7.0-openjdk-devel ant

Now clone the whole forest of Mercurial trees (you can also use fclone with the Forest extension instead, which will save you from doing calling the bash script manually):
$ hg clone http://hg.openjdk.java.net/penrose/jigsaw pj
$ cd pj
$ bash get_source.sh

Set the following environment variables:
export LANG=C
export ALT_BOOTDIR=/usr/lib/jvm/java-1.7.0-openjdk
export ALLOW_DOWNLOADS=true

At this point 'make sanity', which does a rough check on the setup, should succeed:
$ make sanity
...
Sanity check passed.

Ok, we're ready to build:
$ make
... go for a coffee, walk the dog, book a holiday
... after quite a while you'll see that it's finished
-- Build times ----------
Target all_product_build
Start 2012-02-24 08:15:23
End   2012-02-24 08:52:47
00:00:58 corba
00:17:31 hotspot
00:00:19 jaxp
00:00:23 jaxws
00:17:44 jdk
00:00:29 langtools
00:37:24 TOTAL
-------------------------

There you go, you built Penrose and the result is a JDK 8 installation based on the Penrose codebase:
$ cd build/linux-i586/jdk-module-image/bin
$ ./java -version
openjdk version "1.8.0-internal"
OpenJDK Runtime Environment (build 1.8.0-internal-david_2012_02_24_08_15-b00)
OpenJDK Client VM (build 23.0-b11, mixed mode)

Looking forward to start hacking around in the code :)

Thanks to Andrew Haley and Alan Bateman for helping me with some issues I came across along the way.

Tuesday, January 31, 2012

Backing up through FTP on a Mac

It's been a little over half a year now that I made the transition to mac. I was more or less forced into it by Dell because they didn't make the 1920x1200 high-res laptops any more that I like working with.
But I have to say, the Apple hardware is second to none - I haven't experienced any mysterious crashes since.

However I had to find Mac alternatives for all the software that I was using, and I managed to find most of what I was looking for quite quickly...
  • For viewing zip archives I currently use Zipeg, it only does extraction but that's good enough more most cases.
  • I really like Breeze for keyboard-based window alignment, similar to what Windows 7 has.
  • And I started using BetterTouchTool to map a keystroke the mousebuttons (saves me from having to press the touchpad all the time, which I don't really like).
  • I'm still undecided about iTunes, I don't really like it (e.g. it's missing a feature that shows what you're playing in the dock or something like that) but it kinda does what it needs to do and there doesn't seem to be anything better on the Mac, strangely enough...
  • Most other applications that I had been using before have Mac versions, except for...
... a backup solution! I was always using Areca in the past which works great and had both Windows and Linux versions available. I guess everybody on Mac simply buys a Time Machine but I wanted to use my existing network storage drive for my backups.

I found iBackup and used it for about half a year. It was seemingly able to do the work over a Samba mount to my network drive, although I did notice that I was getting many failure runs, in fact over half of the runs were failures. It might have been caused by the SMB implementation on my NAS drive, I don't really know but I noticed that it was having issues with relatively large files (over a couple of megs).
I started looking at using FTP to do the backups instead (my NAS drive supports FTP) but iBackup doesn't support that.

After looking around for a while I couldn't find any freely available backup option for Mac that uses FTP. I might have missed one or two, but in the end I started writing a little shell script to do the job. One of the things that I was worried about was the backup speed. My script logs in and out for every directory recursively so I was concerned that it would take much longer to complete than the SMB option. I was very surprised that for my data it took 9 minutes to complete, where the SMB-based option took several hours if it completed at all.

So here it is, a simple little bash script to backup any directory on your mac using FTP, I invoke it like this
example..
ftp-bku.sh ~/bin ~/docs ~/etc ~/utils
Note that I have my FTP credential in my ~/.netrc file so that I don't need to provide them in the script itself...

For those who are interested, you can find the script below (btw one thing that isn't completely reliable yet is the return code of the ftp program. It's 0 in some cases when there actually is a problem. Not sure if this can be fixed, although I could grep the output for error messages...)

FTPURL=ftp://User@192.168.1.24:2121
FTPBASEDIR=MyDir
TIMESTAMP=$(date +"%d%m%y-%H%M%S")
BACKUPDIR=backup_`hostname`_$TIMESTAMP
# Perform the actual FTP backup
function backup {
    PNAME="$1"
    DNAME="$2"
    ftp -i -V $FTPURL<<EOF
    bin
    cd "$FTPBASEDIR"
    mkdir "$BACKUPDIR"
    cd "$BACKUPDIR"
    lcd "$PNAME"
    mkdir "$DNAME"
    cd "$DNAME"
    mput *
    quit
EOF
    if [ "$?" == "0" ]; then
        echo Backup succeeded: "$BACKUPDIR"
    else
        echo Backup failed: "$BACKUPDIR"
    fi
}
# Backup the directory specified as $2 recursively where the base directory is $1
# So to backup /Users/david/etc/tmp as etc/tmp you pass in 
#  /Users/david/etc/tmp etc/tmp
function backup-dir {
    cd "$1"
    if [ -d "$2" ]; then
        BASE="$1"
        DIR="$2"
        BASELEN="${#BASE}"
        SUBDIR="${DIR:BASELEN}"
        TARGET="`basename "$1"`$SUBDIR"
        backup "$2" "$TARGET"
    fi
    cd "$2"
    for dir in *
    do
        if [ -d "$2/$dir" ]; then
            backup-dir "$1" "$2/$dir"
        fi
    done
}
# Staring point, backup all directories specified on the command line
for directory in "$@"
do
    backup-dir "$directory" "$directory"
done

Monday, August 29, 2011

java.util.ServiceLoader in OSGi

One of the bigger stumbling blocks for migrating an existing application to OSGi has been java.util.ServiceLoader and its predecessors (the various FactoryFinders that can be found in technologies such as JAXP, JAXRS, etc...).

ServiceLoader is a class provided by the JRE aimed at loading pluggable implementations of something. For those who need a little refreshing of the brain, here's what typical ServiceLoader usage looks like... Let's say you have an SPI called MySPI with a single method doit():
public abstract class MySPI {
    public abstract String doit();
}

For some reason SPI providers are often realized as abstract classes, so that's what I'm doing here too. Obviously using an interface is also possible...
You load the SPI implementations by calling ServiceLoader.load(). To obtain the actual implementation objects you iterate over the result of that call:
ServiceLoader ldr = ServiceLoader.load(MySPI.class);
for (MySPI spiObject : ldr) {
  spiObject.doit(); // invoke my SPI object
}
So why is this such a big problem in OSGi? The problem is that the JRE's ServiceLoader is non-modular by design. It relies on a single classloader that has visibility over everything in your system that can possibly contain an implemetation of the service requested. The load() method as used above uses the ThreadContextClassLoader (TCCL) to find all the ServiceLoader implementations in the system. There are a number of issues with this from an OSGi perspective.
  1. The value of the TCCL is generally not defined in an OSGi context.
  2. The implementations are found by looking for a resource in META-INF/services. Every jar that contains an implementation of a service (e.g. my org.acme.MySPI implementation) should advertise this by putting a META-INF/service/org.acme.MySPI file in its jar file.
  3. Once the above resources have been found, the contents of them are parsed to obtain the class names of implementations, normally these classes reside in an implementation package, something like org.acme.impl.MySPIImpl... ServiceLoader will instantiate the classes found using their no-arg constructor.

Issue 2 clearly poses an issue if this resource is to be obtained through the classloading rules set by OSGi as OSGi wires a package import only to precisely one exporter. This gives great predictability (you know exactly where you're getting a package from) but it doesn't work if you need to get the same resource in the same package from multiple bundles. And even if you were able to get all the META-INF/services resources in your system you would still have the issue that the classes listed in there are generally private implementation classes that you don't want to export outside of a bundle. To load and instantiate them from a consuming bundle you'd also have to import these private implementation packages which would be totally horrible (issue 3).

So how should we do this in OSGi? Clearly the best answer is: use the OSGi service registry. It doesn't suffer from any of the problems ServiceLoader has: no need to expose and import private packges, no need to expose in a single package across multiple bundles. Plus the OSGi Service Registry supports a dynamic service lifecycle: services can come can go, additional suitable services can appear, existing services can get replaced. Furthermore, the OSGi ServiceRegistry supports a rich language of selecting services among possible candidates by using LDAP filters that work over service properties, while ServiceLoader simply gives you a snapshot of all the known service implementations at a particular point in time.

However - you might be looking at some code that you'd like to use as-is. You might not have the luxury of using the OSGi Service Registry right now. Maybe you don't have the source code so you can't modify it or maybe you're just focusing on other things and don't want to modify the code. You just like to use the same code that works with ServiceLoader outside of OSGi, in OSGi...

For this use-case I've started looking at a solution. The solution is based on the premise that you don't want or can't modify the code that uses ServiceLoader. Since this code is almost certainly non-OSGi you will have to turn it into an OSGi bundle by either wrapping it (put the original jar unmodified inside an OSGi wrapper bundle) or by modifying the MANIFEST.MF file to add things like Bundle-SymbolicName and Import-Package statements. Since you're modifying this file anyway, it's not a big deal to add an extra header in there to identify the bundle as a ServiceLoader-user. The header is called SPI-Consumer. The simplest form is:
  SPI-Consumer: *
Which means that this bundle is identified as an SPI consumer with no restrictions. This means that when code such as

  ServiceLoader ldr = ServiceLoader.load(MySPIProvider.class);
is encountered, something special will have to be done. What needs to be done is that the TCCL is set to the bundle class loader of the bundle that contains the implementation of MySPIProvider for the duration of the load() call. It needs to be the classloader of the bundle itself, so it has visibility of the private packages which are needed for ServiceLoader to do its business.

In my implementation, which is available in the Apache Aries project, the consumer byte-code is slightly modified so that for the duration of the ServiceLoader.load() call the TCCL is set to the classloader of the providing bundle(s).

How do we know that a bundle is providing an implementation for use with java.util.ServiceLoader? Similar to the consumer side, this code was most likely not written as an OSGi bundle, so it either needs to be wrapped or its MANIFEST.MF needs to be enhanced with Bundle-SymbolicName etc. Here we can identify the bundle as an SPI provider by adding:
  SPI-Provider: *
This means that all the implementations found in META-INF/services are considered as SPI providers. (You can also provide a subset by enumerating all the SPI names provided, instead of specifying *).

Specifying this header does two things:
  1. It marks the bundle as an SPI provider for use with bundles that are marked as SPI consumer.
  2. It registers the implementations found in META-INF/services in the OSGi Service Registry so that they can be used from there too.
Try it out!
Ok - let's try it out. For that you need:
  • An OSGi Framework - I'm going to use JBoss AS7.
  • An SPI Consumer, Provider and the SPI itself.
  • The Aries SPI-Fly project which implements the functionality associated with the SPI-Consumer and SPI-Provider Manifest headers.
Start the OSGi Framework
I'm taking JBoss AS7 which contains a fully compliant OSGi 4.2 Core Framework. Get version 7.0.1 from here: http://www.jboss.org/jbossas/downloads/
Download and unzip it, then run bin/standalone.sh (or standalone.bat):
...
11:49:45,016 INFO  [org.jboss.as.deployment] (MSC service thread 1-12) Started FileSystemDeploymentService for directory /Users/davidb/jboss/jboss-as-web-7.0.1.Final/standalone/deployments
11:49:45,028 INFO  [org.jboss.as] (Controller Boot Thread) JBoss AS 7.0.1.Final "Zap" started in 1671ms - Started 93 of 148 services (55 services are passive or on-demand)

BTW the AS7 appserver started up in 1671ms on my plain mac!

Get some example bundles
I'm going to use some of the example bundles from the Aries SPI-Fly project...

You need a SPI Consumer. For instance this one that uses the SPI from the Bundle Activator:
public class Activator implements BundleActivator {
    public void start(BundleContext context) throws Exception {
        ServiceLoader ldr = ServiceLoader.load(SPIProvider.class);
        for (SPIProvider spiObject : ldr) {
            System.out.println(spiObject.doit()); // invoke the SPI object
        }
    }

    public void stop(BundleContext context) throws Exception {}
}

I have a separate bundle that contains the SPI itself:
public abstract class SPIProvider {
    public abstract String doit();
}

I used an abstract class here instead of an interface as that seems to be common practise with SPIs used with ServiceLoader.

And I have an SPI Provider bundle with an implementation:
package org.apache.aries.spifly.mysvc.impl2;
import org.apache.aries.spifly.mysvc.SPIProvider;

public class SPIProviderImpl extends SPIProvider {
    public String doit() {
        return "Doing it too!";
    }
}

The provider bundle has the SPI-Provider: * Manifest header in it and the consumer bundle has the SPI-Consumer: * header. 
As the SPI-Fly project hasn't been released yet, these bundles can't be downloaded from Maven yet. You can build them yourself from here: http://svn.apache.org/repos/asf/aries/trunk/spi-fly/spi-fly-examples
You can also download them from these locations where I put my built artifacts:
Add OSGi-ServiceLoader support
The Apache Aries SPI Fly component provides two ways to add ServiceLoader support to an OSGi Framework:
  1. Dynamically by using the OSGi 4.3 Weaving Hooks. With this you can install the above bundles as-is in the OSGi Framework and the treatment of the ServiceLoader.load() calls will happen on the fly.
  2. Statically by transforming the bundle Jar file before installing it in the OSGi framework. This mechanism doesn't need the 4.3 Weaving Hooks.
As not all OSGi frameworks support the Weaving Hooks yet, I'll be showing the static mechanism here. If you want to try the dynamic mechanism see the Aries SPI-Fly docs for more info.
The static mechanism consists of a tool that transforms your bundles inserting the bytecode needed to set the TCCL when ServiceLoader.load() is called. You can build the tool yourself from here: http://svn.apache.org/repos/asf/aries/trunk/spi-fly/spi-fly-static-tool or download the copy that I built from here: spifly-static-tool.jar .

  java -jar spifly-static-tool.jar consumer-bundle.jar
  [SPI Fly Static Tool] Processing: consumer-bundle.jar

When it's finished you'll find a new bundle called consumer-bundle_spifly.jar in the same directory. This bundle has the ServiceLoader.load() calls treated so that the TCCL is set appropriately for it to work.

Use it at Runtime
Our transformed client bundle has an additional dependency on some SPI-fly classes which are used to appropriately set the TCCL once ServiceLoader.load() is called. This bundle can be found here: http://svn.apache.org/repos/asf/aries/trunk/spi-fly/spi-fly-static-bundle and I have created a pre-built version as well: spifly-static-bundle.jar .

Deploy them into your OSGi Framework. AS7 supports a variety of deployment mechanisms, via maven, AS7 Web Console or Command Line, Felix OSGi Console or JMX. For the sake of simplicity I'm using deployment by copying to the standalone/deployments folder here. Note that although deployment by copying is extremely simple, it does require attention to the order as the bundles found in the deployments folder are instantly started.

So I'm deploying:
On the console we'll see various log messages appear, including these from our SPI Consumer:

12:44:27,480 INFO  [stdout] (MSC service thread 1-3) *** Result from invoking the SPI directly:
12:44:27,483 INFO  [stdout] (MSC service thread 1-3) Doing it too!

Which shows that our ServiceLoader Consumer bundle is now working property inside OSGi.

Conclusion
This example uses java.util.ServiceLoader provider and consumer implementations as-is in OSGi. Using the OSGi Service Registry is clearly a nicer solution, but you simply don't always have the option to change the code from using ServiceLoader to using the OSGi ServiceRegistry. That's where OSGi ServiceLoader support may come in useful.

It can already be used today in any compliant OSGi 4.2 Framework, but in that case consumer bundles need to be transformed before they are installed. If you have a 4.3 (or later) framework the transformation can happen on the fly which means that the whole process becomes more user-friendly: just install ServiceLoader support in the Framework and deploy your bundles - no static tool is needed in that case.

ServiceLoader support is being turned in an OSGi Specification scheduled to be part of the upcoming OSGi Enterprise Release (due early 2012). You can read more details about it in RFC 167 in the Early Access Draft here: http://www.osgi.org/download/osgi-early-draft-2011-05.pdf